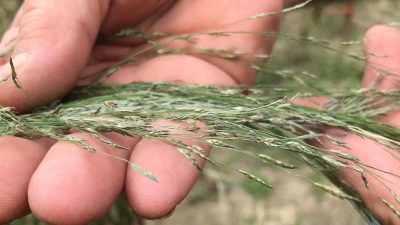
Teff (ጤፍ)
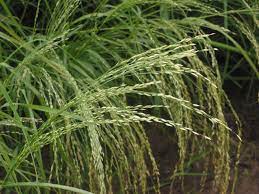
Teff, a grain native to the Horn of Africa is predominately grown in Eritrea and Ethiopia. This ancient grain is the smallest of all grains and is comparable to the size of a poppy seed.
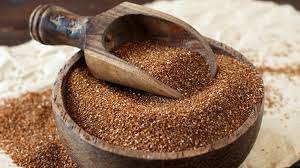
The grain comes in a variety of colors from dark brown to ivory. The flour from teff is used to make the traditional Ethiopian & Eritrean bread called injera, a pancake-like, fermented bread.
Teff has been popular in recent years in the whole food and Health food industry for its gluten-free properties. The grain is an excellent source of fiber, iron, calcium, potassium, and other minerals. Due to the high demand for the grain by Ethiopian & Eritrean diasporas as well as the gluten-free market, states like Idaho have started to cultivate teff. Besides injera, Teff can be made into polenta and also be used as a substitution for other grains in recipes such as breads, cakes, and cookies.
Scroll through some recipes!
Traditional Injera
Ingredients
- For injera starter – Traditional injera requires an injera starter, similar to a sourdough starter, created approximately three days before mixing the batter.
- 1 cup Teff flour
- 2 cups lukewarm water
- For dough
- 2 cups starter
- 6 cups Teff flour
- 8 cups lukewarm water
- For Absit – Gelatinization.
- 2 cups (473g) water
- 1 cup (274g) batter
- 2-4 cups (473g-946g) of room temperature water
Instructions
- For injera starter
- Combine 1 cup of Teff flour with 2 cups of room temperature water in a container.
- Whisk until there are no clumps of flour and ingredients are thoroughly combined. You should see a thin foam film develop on the top.
- Seal the container store in a dark, dry room at around 70 degrees Fahrenheit. The warmer the room, the faster your starter will ferment.
- Observe fermentation throughout the next three days, but do not touch or disturb the container.
- After 3 days, you should see a foamy film form on top of some murky water, above your starter. Discard the foam and water, and stir your remaining starter. To store, add water (about 3/4 cup for this ratio) and store in the refrigerator.
- For dough
- In a large sealable container (we suggest clear for the first time), mix the starter with the flour. You can also mix in a large bowl and then transfer to a sealable container.
- Gradually pour 3-4 cups of water, one cup at a time, while mixing either by hand or with a mixer. You may not need the full 4 cups as you want the dough to be a thick consistency.
- Knead the dough for about 3-5 minutes, until it is very thick but smooth. The dough should peel off the bowl sides easily.
- Press the doughy batter into the bottom of the container.
- Use the remaining 3-4 cups of water to clean off the container’s sides. Be sure not to mix the water with the dough, as the layer of water (aka “top water”) is just meant to keep mold from growing on the surface of the pressed dough. There should be a thick layer of the dough and a layer of murky water above when done.
- Put a tight lid on the container and store in a dry place at room temperature for 1-3 days based on desired sourness (one day being less sour and three days being very acidic). You may also discard the top water and place new water of the same amount daily to reduce sourness as well.
- For gelatinization
- After 1-3 days, open the container with the batter and discard the top water. The dough will have become more like a thick batter than a dough. Mix thoroughly.
- Bring 2 cups of water to a boil then turn the heat down to a medium-low. Add about 1 cup of batter to the water while whisking to avoid clumping. Then turn heat back to medium-high to bring mixture to a boil.
- Once it has bubbled, add the mixture into the batter and dilute with 1-2 additional cups of water until desired consistency is reached. The batter should be thick enough to lightly coat the spoon but not so thick that you cannot see the spoon.
- Ensure the batter is the right consistency as no pure water can be added after the final fermentation is complete.
- Seal with the lid and leave in a dark and dry room until small bubbles form towards the surface, anywhere from 1-4 hours. We have found 2 hours in the fridge works well.
- Final cooking step
- Once the small bubbles develop, your batter is now ready to cook. Remove any water that has separated and set aside to add back if needed for desired consistency.
- Heat your non-stick cooking surface to medium-high (use a crepe pan or a flat skillet if not using a mitad).
- For the first injera, use less batter to check the bubble formation (aka “eyes”).
- Once about 80% of the eyes have formed, cover with a lid.
- Remove lid once steam starts to develop. The edges of the injera should have started lifting off the cooking surface.
- Slide a thin mat under the injera and use it to lift the injera from the grill.
- We suggest using parchment paper or a plastic surface to help the injera cool. Wait for the injera to cool down entirely before stacking to avoid sticking. Top with desired stews and enjoy!
Teff and Beet Idli
Ingredients
- 1 cup Teff grains (Brown or Ivory)
- ½ cup urad dal (lentils)
- ¼ teaspoon fenugreek seeds
- ½ cup beet leaves (or any type of greens)
- Salt to taste
- Room temperature water
Instructions
- In one bowl, soak your teff grains in room temperature water. In a second bowl, rinse your urad dal. Combine with fenugreek seeds and soak in room temperature water. Set aside for 6-8 hours of overnight.
- Drain both bowls and place in blender. Blitz until mixture becomes a smooth puree. Add 2-5 tablespoons of water, as needed.
- Pour mixture into a container with a lid. Mix batter with your hands (using hands helps transfer body heat and aid fermentation).
- Leave to ferment in a warm dark place for 8 hours.
- Stir batter with spoon and check to make sure the consistency is thick. Add sea salt as needed. Stir in ½ cup chopped beet leaves.
- Pour 1 cup of water into the bottom of the Idli Cooker and place Idli plate or mold on top. Spray plate with cooking oil.
- Fill molds with batter and steam. After 12 minutes let them rest for another 5 minutes than sprinkle lightly with water to help demold and carefully remove them with a spoon.
- Serve them warm with chutney or Sāmbhar.