
Chapters allow viewers to jump to specific parts of a YouTube video. This is especially helpful for longer videos, tutorials, lectures, and presentations. Chapters improve viewer experience, accessibility, and make your video easier to navigate and reference.
This tutorial walks you through adding chapters to a YouTube video using timestamps in the video description.
1. Upload and Publish Your Video
- Sign in to YouTube Studio
- Upload and publish your video
- Wait until processing is complete
Chapters can be added after the video is published.
2. Open the Video Details Page
- In YouTube Studio, click Content
- Select the video you want to edit
- Scroll to the Description box
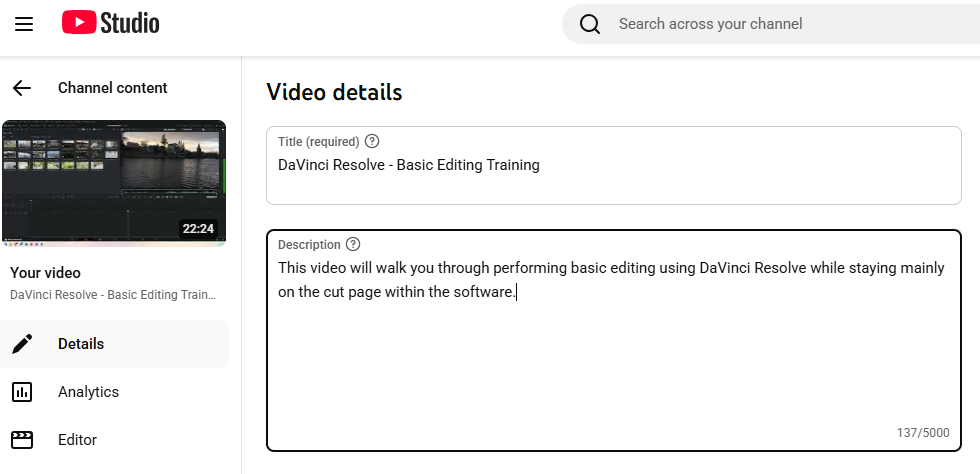
This is where chapters are created.
3. Create Chapter Timestamps
- In the description, add timestamps in this format:
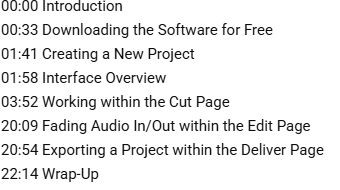
- Each timestamp must be on its own line
- Each timestamp must include a title
YouTube automatically converts these into clickable chapters.
4. Follow Chapter Rules
To work correctly, chapters must meet these requirements:
- The first timestamp must start at 00:00
- There must be at least three chapters
- Each chapter must be 10 seconds or longer
- Titles should be clear and descriptive
If these rules aren’t met, chapters will not appear.
5. Save Your Changes
- Click Save
- Refresh the video page to confirm chapters appear
Chapters will appear as sections on the playback bar as well as in the description as clickable links.
6. Edit or Update Chapters
- Return to the video description at any time
- Adjust timestamps or titles as needed
- Save changes again
Chapters update immediately.
Helpful Tips
- Keep chapter titles short and meaningful
- Use chapters for major content shifts, not every sentence
- Match titles to what viewers see or hear at that moment
- Chapters work well alongside captions for accessibility
- Chapters help viewers rewatch specific sections later
For more information, visit YouTube’s Help Center.