So, if you have been following the blog you now have had a glimpse behind the scenes and read about why I initiated this project. Hopefully you have watched a few of our videos by now. If you haven’t, please do so before reading this blog post.
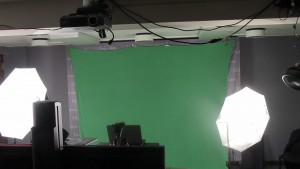
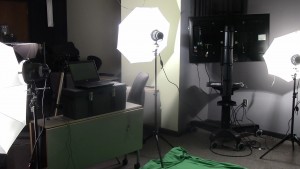
Welcome back. So, you watched a few videos and thought, “Wow! How did they do that.” Ok, perhaps you said, “Meh…” but are still interested in our process. Aleks and I will walk you through a video from start to finish. We really had no fancy equipment; only what we could get at our media center on campus. You’ll see in the images that we worked in about half of a small room that served as our studio and then edited in a old closet.
What kind of experience did we have coming into this project? Karl has conducted some oral histories and edited in iMovie (he hates Apple products, but iMovie is far superior to Windows Movie Maker). During the year Aleks works at the Clarke Forum for Contemporary Issues where she regularly uses software such as PhotoShop, InDesign, iMovie, and Audacity to create visuals and edit interviews. Because Aleks knew more of the editing tech than Karl, in most cases we divided the labor. Karl came up with ideas and wrote scripts; Aleks filmed and edited it all. There are some exceptions which we will discuss at a later time.
First thing you should know: There was a long and steep learning process. We added, deleted, and moved equipment trying to get the look we wanted. Neither of us had done video storytelling before, and neither had used a green screen. These were probably the two biggest challenges.
Storytelling:
Don’t think that you can simply take your lecture notes and use that as your script. I would expect that few of us write out our lectures in full sentences. I for one use bullet points and then often fail to look at my notes. The logical ordering of ideas won’t necessarily change, but the narrative probably will. Remember, without a live audience, there is no one to ask questions for clarification, so a script is essential. When you can’t see your audience, you also can’t read visual cues. Therefore, it is important to bring more dynamism to the video. Much of this can be done with visuals, more so than you might use in class, but at some point you will be on camera and should be somewhat animated.
I made the mistake of starting our first shoot sitting down in a chair. Needless to say, we reshot that. But your movement also needs to be choreographed to some extent. Should you move back and forth as you might do in class? What do your hands do? Should you stand left, right, or center? You need to think about the images that might share the screen with you. How do you normally connect with individual students in your class? Eye contact is important, but how do you do that on video. The short answer is to look at the camera.
But can you memorize 12 minutes of material? I’m not an actor (and you have seen that in the videos!), so I can’t memorize long texts. Initially, we fashioned a teleprompter from a large screen TV and placed it just behind and above the camera. When reviewing the first cuts, I realized that I have a tendency to talk with my chin above horizontal; when I had to look above the camera for the script, it appeared that I was staring off into space. As you will see in the image of the studio, we then placed my laptop just under the camera. This forced me to lower my chin and move my eyes closer to the camera lens. Prepare yourself! If you haven’t spent much time on camera, you will learn a great many things about your voice and mannerisms.
Once the script was in rough form, we went searching for images. In some cases, the image prompted the text, but usually it was the other way around. So where do you find images? You could scan them from all your favorite books, but it is becoming increasingly easier to find good quality images online. Your best friend will become Creative Commons. There is much to like about Creative Commons. There are numerous sources of images within the Commons like Flikr, Google Images, and Pixabay. No need to go surfing from one site to another and repeating all the searches. The most important thing is that you can almost always find the copyright status of the image. Because we wanted the videos to be public rather than password protected on our learning platform (we use Moodle at Dickinson), we needed to know that our images were public domain. Google Images and Flikr are particularly good about making the status clear and providing language for citations.
Here are some things to think about when hunting for images. In addition to finding what illustrates your point, you need to think about size and orientation. If you want the image to cover the entire screen, look for landscape orientations. If you know that you want the image to pop up on the screen next to you, portrait orientation will be better. When in doubt, choose the largest file size available so that if you need to expand the size of the image it won’t pixelate too much.
In our next blog post, we will discuss the pros and cons of using a green screen. Until then, enjoy the Time Capsules on YouTube or Dickinson Scholar.

